Flashing coreboot on Gigabyte GA-G41M-ES2L with a ch341a USB programmer Tutorial
In this tutorial, we will go through the steps to get coreboot compiled and flashed on a Gigabyte GA-G41M-ES2L motherboard.
Updated 2022-01-13: Use latest coreboot-4.15 release
Prerequisites
Things you need:
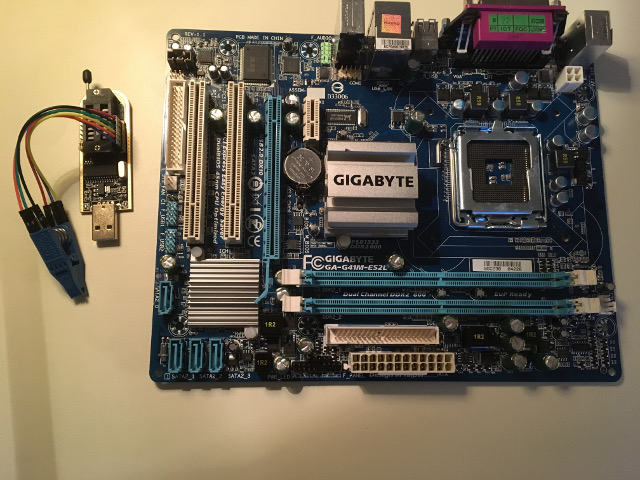
- Gigabyte GA-G41M-ES2L
- ch341a USB programmer
- Pomona 5250 SOIC-8 clip
- 6 x 10 cm female - female jumper wires
This tutorial assumes you're using a GNU/Linux distro and are familiar with how to use a terminal.
Debian GNU/Linux 11 (bullseye) was used to compile the coreboot image produced in this tutorial.
Files needed:
Packages needed to compile flashrom/coreboot/grub
sudo apt-get build-dep flashrom grub
sudo apt-get install git build-essential gnat flex bison libncurses5-dev libfreetype-dev pkg-config unifont wget
Compile flashrom
Clone flashrom git repository:
git clone https://review.coreboot.org/flashrom.gitCompile flashrom:
cd flashrom
sudo make install
sudo cp /usr/local/sbin/flashrom /usr/local/bin/
Connect ch341a USB programmer to flash chip
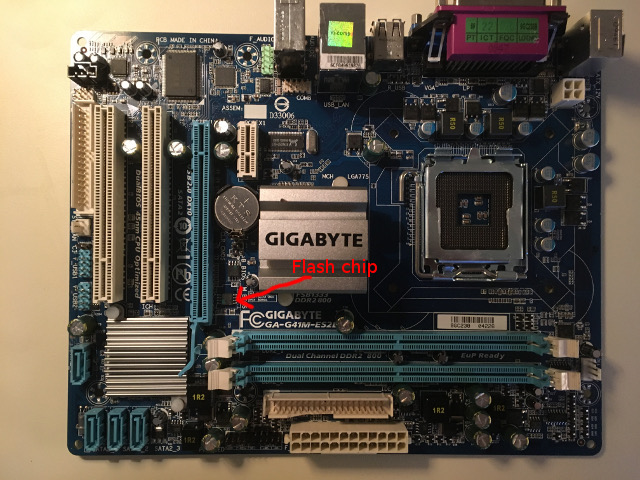
Connect Pomona 5250 to flash chip named 'M_BIOS' like this:
Gigabyte logo text towards you:
             __
    CS  5 --|  |-- 4  3.3v
  MISO  6 --|  |-- 3  N/C
   N/C  7 --|  |-- 2  CLK
   GND  8 --|__|-- 1  MOSI

   N/C = Not connected / Not used
Read Factory BIOS
Read Factory BIOS 3 times:
sudo flashrom -p ch341a_spi -r factory_bios_01.rom -V
sudo flashrom -p ch341a_spi -r factory_bios_02.rom -V
sudo flashrom -p ch341a_spi -r factory_bios_03.rom -V
Make sure checksums are identical:
sha512sum *.romDownload coreboot
Download coreboot:
wget https://coreboot.org/releases/coreboot-4.15.tar.xz
wget https://coreboot.org/releases/coreboot-blobs-4.15.tar.xz
coreboot-blobs-4.15.tar.xz is needed for CPU microcode updates.
Extract coreboot:
tar xvf coreboot-4.15.tar.xz
tar xvf coreboot-blobs-4.15.tar.xz --strip-components=1 -C coreboot-4.15
Setup and compile coreboot
Enter coreboot folder:
cd coreboot-4.15Build toolchain needed first (this will take a long time, be patient):
make crossgcc-i386 CPUS=4coreboot settings menu:
make menuconfigSet the following options:
NOTE: Leave default values as is and specifically set the following
options:

mainboard ---------|
                   |-Mainboard vendor (GIGABYTE)
                   |-Mainboard model (GA-G41M-ES2L)
                   |-ROM chip size (1024 KB (1 MB))
                   |-0x00100000) Size of CBFS filesystem in ROM
chipset -----------|
                   |-Include CPU microcode in CBFS (Generate from tree)
Devices -----------|
                   |-Graphics initialization (Use libgfxinit)
                   |-Display
                   |-    Legacy VGA text mode
Generic Drivers ---|
                   |-(XX:XX:XX:XX:XX:XX) Realtek rt8168 mac address
payload -----------|
                   |-Add a payload (GRUB2)
                   |-    GRUB2 version (2.04)
If you don't want to include CPU microcode updates:
chipset ---|
           |-Include CPU microcode in CBFS (Do not include microcode updates)
Check the mac address for the onboard RT8168 network card and enter that in 'Generic Drivers -> Realtek rt8168 mac address'. My board is rev. 1.1 and it didn't find the onboard network card at all. If this happens to you, just leave default mac address as is and install a PCI or PCI express network card instead. I'm using a PCI network card 'D-Link DGE-528T' which uses RTL8169 kernel driver. Do some research beforehand to make sure your network card will work with default libre kernel drivers.
This will create a '.config' file containing all settings.
Compile coreboot:
make -j4This will create 'build/coreboot.rom' image with the size of 1mb.
Add custom files to 'coreboot.rom' image
Add 'grub.cfg' to coreboot.rom. See 'Prerequisites' above for the file needed.
Make sure 'cbfstool' is built:
cd coreboot-4.15/util/cbfstool
make -j4
Add custom GRUB2 configuration file:
./cbfstool ../../build/coreboot.rom add -t raw -n etc/grub.cfg -f your/path/to/grub.cfgCheck so that 'etc/grub.cfg' exists in coreboot.rom:
./cbfstool ../../build/coreboot.rom printDone! Now it's time to flash the new 'coreboot.rom' image!
Flash coreboot image
See 'Connect ch341a USB programmer to flash chip' for details on how to connect ch341a USB programmer.
Flash coreboot using ch341a USB programmer:
sudo flashrom -p ch341a_spi -w coreboot.rom -VAdditional parts needed
To build a desktop/server the following additional parts are needed:
Desktop case
Power supply
CPU
CPU Fan
Memory
Harddrive
Here's the parts I used to build a server:
Desktop case: Fractal Design Define R6 Gunmetal
Power supply: Corsair RM750X 750W v2
CPU: Intel Core 2 Quad Q9550 2,83 GHz 12M
CPU Fan: Arctic Cooling Freezer 7 Pro rev.2
Memory: Corsair 2 x 2 GB DDR2 800 (PC2-6400) Memory
Network card: D-Link DGE-528T PCI (RTL8169 kernel driver)
Harddrive: Samsung 850 EVO 250GB SSD harddrive
PCI Express to USB 3.0 4-Port PCI Express Expansion Card Adapter Hub VIA 5Gbps
PCI Express SATA 3 Controller Card, 2 Port PCIe SATA III 6GB/s Internal Ada L80
The parts were carefully choosen so that the server would be as close to completely silent as possible and be able to run 100% free/libre software.
For a list of compatible CPU's (socket LGA 775), see:
https://en.wikipedia.org/wiki/List_of_Intel_Core_2_microprocessors
The onboard network card might not work by default, and if so, just get a PCI or PCI Express network card.
Now you can install a libre distro such as Debian GNU/Linux.
Boot Debian GNU/Linux netinst iso from usb in GRUB2
Download Debian GNU/Linux netinst from here.
Check name of USB device:
sudo fdisk -lCreate bootable USB drive:
sudo dd bs=4M if=/path/to/debian-img.iso of=/dev/YOUR_USB status=progress oflag=syncStart the computer up and in the GRUB2 menu press 'c' to enter command line and from there type the following:
set root='usb0'
linux /install.amd/vmlinuz
initrd /install.amd/initrd.gz
boot
Install Debian GNU/Linux normally and put GRUB2 on master boot record at the end of installation process. After reboot default option in GRUB2 menu on the flashchip will load GRUB2 on the AHCI HDD you installed on.
Download compiled coreboot image
The resulting coreboot image from this tutorial can be downloaded here:
gigabyte-ga-g41m-es2l_coreboot-4-15-grub-2-04-with-cpu-microcode.rom
Congratulations! We’re done.
Recommended reading
https://www.coreboot.org/
https://www.flashrom.org/
https://en.wikipedia.org/wiki/List_of_Intel_Core_2_microprocessors
https://dejavu-fonts.github.io/
https://dejavu-fonts.github.io/License.html
Unless otherwise stated, blog posts on this site are copyrighted by their respective authors and published under the terms of the CC-BY-SA 4.0 license.