Flashing coreboot on a Lenovo Thinkpad X230 with a Raspberry Pi Tutorial
In this tutorial, we will go through the steps to get coreboot compiled and flashed on a Lenovo Thinkpad X230 laptop.
We'll also change the Wifi card so that Wifi will work with a libre kernel driver.
Prerequisites
Things you need:
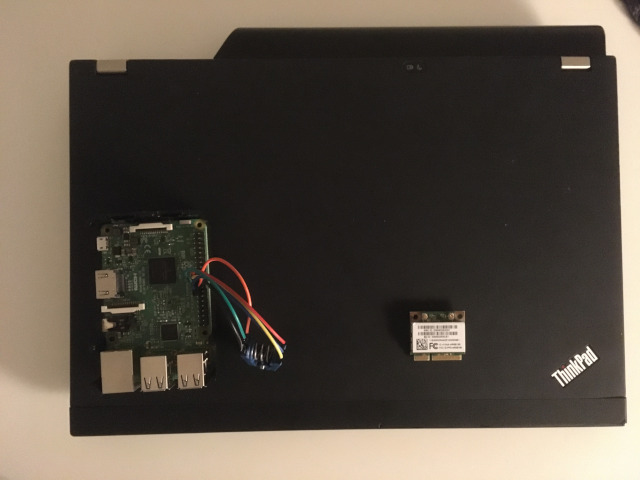
- Lenovo Thinkpad X230
- Atheros AR9382 AR5BHB116 Mini PCIE Dual Band Wifi card
- Raspberry Pi or ch341a USB programmer
- Pomona 5250 SOIC-8 clip
- 6 x 10 cm female - female jumper wires
- Screwdriver
This tutorial assumes you're using a GNU/Linux distro and are familiar with how to use a terminal.
Debian GNU/Linux 11 (bullseye) was used to compile the coreboot image produced in this tutorial.
Files needed:
dejavusansmono.pf2grub.cfgbackground.jpg
For more information about DejaVu Fonts, see:
https://dejavu-fonts.github.io/
For DejaVu Font license, see:
https://dejavu-fonts.github.io/License.html
'background.jpg' is borrowed from the libreboot project and it's license information is as follows:
These images are based on http://libreboot.org/logo/logo.svg
which is Copyright 2014 Marcus Moeller and released under CC-0
https://creativecommons.org/publicdomain/zero/1.0/legalcode
Packages needed to compile flashrom/coreboot/grub
sudo apt-get build-dep flashrom grub
sudo apt-get install git build-essential gnat flex bison libncurses5-dev libfreetype-dev pkg-config unifont wget
Compile flashrom
Clone flashrom git repository:
git clone https://review.coreboot.org/flashrom.gitCompile flashrom:
cd flashrom
sudo make install
sudo cp /usr/local/sbin/flashrom /usr/local/bin/
Compile GRUB
See 'Prerequisites' above for the files needed.
Clone GRUB git repository:
git clone https://git.savannah.gnu.org/git/grub.gitCompile GRUB:
cd grub
./bootstrap
./configure --with-platform=coreboot
make -j4
Create 'pack-payload-minimal.sh' script file:
touch pack-payload-minimal.sh
chmod +x pack-payload-minimal.sh
Paste the following in 'pack-payload-minimal.sh':
#! /bin/bash

# ./pack-payload-minimal.sh – To be invoked within GRUB project folder, packs
# an executable elf payload file for the coreboot project, using just one
# keyboard layout file. Adapt “settings” to your needs. Specify a lighter
# pf2-fontfile if available on your system.

# settings
elf_output="grub2.elf"
#pf2_fontfile="unicode.pf2"
pf2_fontfile="dejavusansmono.pf2"
keyboard_layout="se"
grub_modules="cbfs"

# generate keyboard layout
ckbcomp "${keyboard_layout}" | ./grub-mklayout -o "${keyboard_layout}.gkb"

# pack the GRUB payload file
./grub-mkstandalone \
        --grub-mkimage=./grub-mkimage \
        -O i386-coreboot \
        -o "${elf_output}" \
        -d grub-core \
        --fonts= \
        --themes= \
        --locales= \
        --modules="${grub_modules}" \
        /boot/grub/grub.cfg=coreboot.cfg \
        /boot/grub/fonts/${pf2_fontfile}="${pf2_fontfile}" \
        /boot/grub/layouts/${keyboard_layout}.gkb="${keyboard_layout}.gkb"

# message
echo "Payload ${elf_output} has been packed with:"
echo " * fontfile: ${pf2_fontfile}"
echo " * keyboard layout: ${keyboard_layout}"
echo " * GRUB modules, to be preloaded: ${grub_modules}"

# code snippet suggestion
echo "Don't forget to add 'keymap ${keyboard_layout}' to your GRUB Configuration File."

# clean up
rm "${keyboard_layout}.gkb"
Execute the script to create 'grub2.elf' file:
./pack-payload-minimal.shConnect programmer to flash chip
See Setup Raspberry Pi for flashing with flashrom Tutorial
if you're using a Raspberry Pi.
Remove the following parts to access the flash chip:
Battery
Keyboard
Palmrest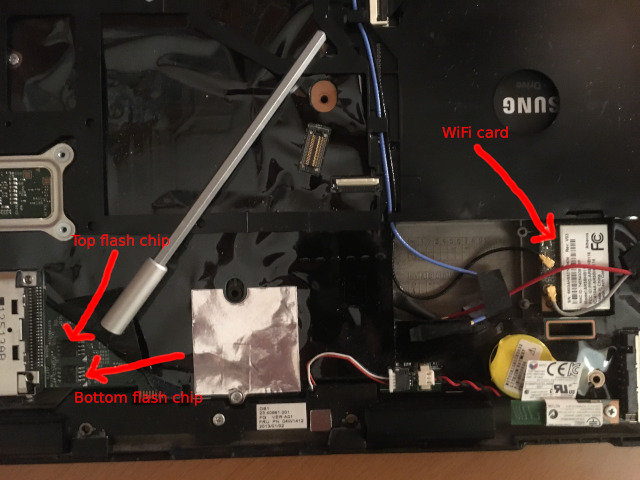
Connect Pomona 5250 to flash chip like this (same for both top and bottom flash chips):
Screen (furthest from you)
             __
  MOSI  5 --|  |-- 4  GND
   CLK  6 --|  |-- 3  N/C
   N/C  7 --|  |-- 2  MISO
  3.3V  8 --|__|-- 1  CS

   Edge (closest to you)

   N/C = Not connected / Not used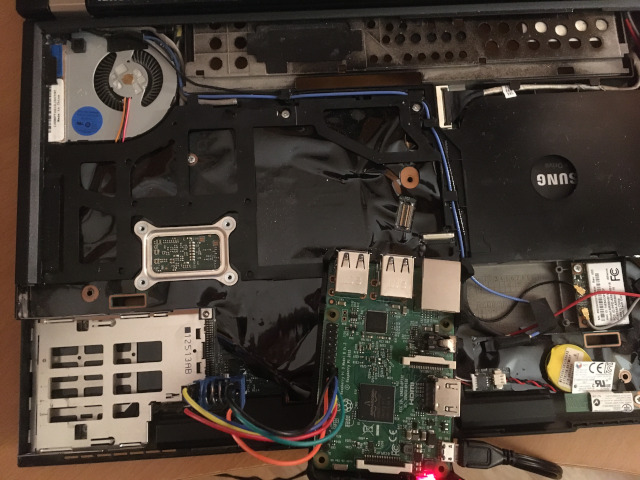
Read Factory BIOS from Top flash chip
Read Factory BIOS 3 times if using Raspberry Pi:
sudo flashrom -p linux_spi:dev=/dev/spidev0.0,spispeed=32768 -r factory_bios_top_01.rom -c "MX25L3206E/MX25L3208E" -V
sudo flashrom -p linux_spi:dev=/dev/spidev0.0,spispeed=32768 -r factory_bios_top_02.rom -c "MX25L3206E/MX25L3208E" -V
sudo flashrom -p linux_spi:dev=/dev/spidev0.0,spispeed=32768 -r factory_bios_top_03.rom -c "MX25L3206E/MX25L3208E" -V
Read Factory BIOS 3 times if using ch341a:
sudo flashrom -p ch341a_spi -r factory_bios_top_01.rom -c "MX25L3206E/MX25L3208E" -V
sudo flashrom -p ch341a_spi -r factory_bios_top_02.rom -c "MX25L3206E/MX25L3208E" -V
sudo flashrom -p ch341a_spi -r factory_bios_top_03.rom -c "MX25L3206E/MX25L3208E" -V
Make sure checksums are identical:
sha512sum *.romRead Factory BIOS from Bottom flash chip
Read Factory BIOS 3 times if using Raspberry Pi:
sudo flashrom -p linux_spi:dev=/dev/spidev0.0,spispeed=32768 -r factory_bios_bottom_01.rom -c "MX25L6406E/MX25L6408E" -V
sudo flashrom -p linux_spi:dev=/dev/spidev0.0,spispeed=32768 -r factory_bios_bottom_02.rom -c "MX25L6406E/MX25L6408E" -V
sudo flashrom -p linux_spi:dev=/dev/spidev0.0,spispeed=32768 -r factory_bios_bottom_03.rom -c "MX25L6406E/MX25L6408E" -V
Read Factory BIOS 3 times if using ch341a:
sudo flashrom -p ch341a_spi -r factory_bios_bottom_01.rom -c "MX25L6406E/MX25L6408E" -V
sudo flashrom -p ch341a_spi -r factory_bios_bottom_02.rom -c "MX25L6406E/MX25L6408E" -V
sudo flashrom -p ch341a_spi -r factory_bios_bottom_03.rom -c "MX25L6406E/MX25L6408E" -V
Make sure checksums are identical:
sha512sum *.romCombine Bottom and Top rom files
Combine bottom and top into a 12MB combined rom file:
cat factory_bios_bottom_01.rom factory_bios_top_01.rom > factory_bios_combined.romDownload coreboot
Download coreboot:
wget https://coreboot.org/releases/coreboot-4.15.tar.xz
wget https://coreboot.org/releases/coreboot-blobs-4.15.tar.xz
coreboot-blobs-4.15.tar.xz is needed for CPU microcode updates.
Extract coreboot and blobs needed:
tar xvf coreboot-4.15.tar.xz
tar xvf coreboot-blobs-4.15.tar.xz --strip-components=1 -C coreboot-4.15
Create folder to hold 'descriptor/gbe/me.bin' files:
mkdir -pv coreboot-4.15/3rdparty/blobs/mainboard/lenovo/x230/Extract blobs from 'factory_bios_combined.rom'
Extract flash descriptor, BIOS, Intel ME, GbE and platform data regions:
cd ~/misc-src/coreboot-4.15/util/ifdtool/
make
./ifdtool -x factory_bios_combined.rom
Copy blob files to coreboot folder:
cp flashregion_0_flashdescriptor.bin ../../3rdparty/blobs/mainboard/lenovo/x230/descriptor.bin
cp flashregion_2_intel_me.bin ../../3rdparty/blobs/mainboard/lenovo/x230/me.bin
cp flashregion_3_gbe.bin ../../3rdparty/blobs/mainboard/lenovo/x230/gbe.bin
Setup and compile coreboot
Enter coreboot folder:
cd coreboot-4.15Build toolchain needed first (this will take a long time, be patient):
make crossgcc-i386 CPUS=4coreboot settings menu:
make menuconfigSet the following options:
NOTE: Leave default values as is and specifically set the following
options:

mainboard -|
           |-Mainboard vendor (Lenovo)
           |-Mainboard model (ThinkPad X230)
           |-ROM chip size (12288 KB (12 MB))
           |-(0x300000) Size of CBFS filesystem in ROM
chipset ---|
           |-Include CPU microcode in CBFS (Generate from tree)
           |-[*] Add Intel descriptor.bin file (leave default path as is)
           |-(3rdparty/blobs/mainboard/$(MAINBOARDDIR)/descriptor.bin) Path and filename of the descriptor.bin file
           |-[*] Add Intel ME/TXE firmware (leave default path as is)
           |-(3rdparty/blobs/mainboard/$(MAINBOARDDIR)/me.bin) Path to management engine firmware
           |-    [*] Verify the integrity of the supplied ME/TXE firmware
           |-    [*] Strip down the Intel ME/TXE firmware
           |-[*] Add gigabit ethernet firmware (leave default path as is)
           |-(3rdparty/blobs/mainboard/$(MAINBOARDDIR)/gbe.bin) Path to gigabit ethernet firmware
Devices ---|
           |-Graphics initialization (Use libgfxinit)
           |-Display
           |-    Framebuffer mode (Linear "high-resolution" framebuffer)
           |- Add a Video Bios Table (VBT) binary to CBFS
           |- (src/mainboard/$(MAINBOARDDIR)/variants/$(VARIANT_DIR)/data.vbt)
Generic Dr.|
           |- Select: PS/2 keyboard init
payload ---|
           |-Add a payload (An ELF executable payload)
           |-"(/path/to/grub/grub2.elf)" Payload path and filename
If you don't want to include CPU microcode updates:
chipset ---|
           |-Include CPU microcode in CBFS (Do not include microcode updates)
This will create a '.config' file containing all settings.
Compile coreboot:
make -j4This will create 'build/coreboot.rom' image with the size of 12mb.
Add custom files to 'coreboot.rom' image
Add 'grub.cfg' and 'background.jpg' to coreboot.rom. See 'Prerequisites' above for the files needed.
Make sure 'cbfstool' is built:
cd coreboot-4.15/util/cbfstool
make -j4
Add custom GRUB configuration file:
./cbfstool ../../build/coreboot.rom add -t raw -n etc/grub.cfg -f your/path/to/grub.cfgCheck so that 'etc/grub.cfg' exists in coreboot.rom:
./cbfstool ../../build/coreboot.rom printAdd background image:
./cbfstool ../../build/coreboot.rom add -t raw -n background.jpg -f your/path/to/background.jpgCheck so that 'background.jpg' exists in coreboot.rom:
./cbfstool ../../build/coreboot.rom printDone! Now it's time to flash the new 'coreboot.rom' image!
Split coreboot.rom into top and bottom
Enter coreboot folder:
cd coreboot-4.15dd if=build/coreboot.rom of=build/coreboot_bottom.rom bs=1M count=8
dd if=build/coreboot.rom of=build/coreboot_top.rom bs=1M skip=8Flash Top flash chip coreboot image
See 'Connect programmer to flash chip' for details on how to connect programmer.
Flash coreboot using Raspberry Pi programmer:
sudo flashrom -p linux_spi:dev=/dev/spidev0.0,spispeed=32768 -w coreboot_top.rom -c "MX25L3206E/MX25L3208E" -VFlash coreboot using ch341a USB programmer:
sudo flashrom -p ch341a_spi -w coreboot_top.rom -c "MX25L3206E/MX25L3208E" -VFlash Bottom flash chip coreboot image
See 'Connect programmer to flash chip' for details on how to connect programmer.
Flash coreboot using Raspberry Pi programmer:
sudo flashrom -p linux_spi:dev=/dev/spidev0.0,spispeed=32768 -w coreboot_bottom.rom -c "MX25L6406E/MX25L6408E" -VFlash coreboot using ch341a USB programmer:
sudo flashrom -p ch341a_spi -w coreboot_bottom.rom -c "MX25L6406E/MX25L6408E" -VChange Wifi card
Remove the following parts to access the Wifi card:
Battery
Keyboard
Palmrest
See 'Connect programmer to flash chip' for details on where the Wifi card is located.
Now you can install a libre distro such as Debian GNU/Linux.
Boot Debian GNU/Linux netinst iso from usb in GRUB2
Download Debian GNU/Linux netinst from here.
Check name of USB device:
sudo fdisk -lCreate bootable USB drive:
sudo dd bs=4M if=/path/to/debian-img.iso of=/dev/YOUR_USB status=progress oflag=syncStart the computer up and in the GRUB2 menu press 'c' to enter command line and from there type the following:
set root='usb0'
linux /install.amd/vmlinuz
initrd /install.amd/initrd.gz
boot
Install Debian GNU/Linux normally and put GRUB2 on master boot record at the end of installation process. After reboot default option in GRUB2 menu on the flashchip will load GRUB2 on the AHCI HDD you installed on.
Download compiled coreboot images
The resulting coreboot images from this tutorial can be downloaded here:
lenovo-thinkpad-x230_coreboot-4-15-grub-master-with-cpu-microcode-top.romlenovo-thinkpad-x230_coreboot-4-15-grub-master-with-cpu-microcode-bottom.rom
Congratulations! We’re done.
Recommended reading
https://www.coreboot.org/
https://www.flashrom.org/
https://www.thinkwiki.org/wiki/Category:X230
https://download.lenovo.com/pccbbs/mobiles_pdf/0b48666.pdf
https://dejavu-fonts.github.io/
https://dejavu-fonts.github.io/License.html
Unless otherwise stated, blog posts on this site are copyrighted by their respective authors and published under the terms of the CC-BY-SA 4.0 license.